Create a Script for Handling Incoming Communications
You must:
- Create a script of type 'Inbound'.
- Add action cells.
- Connect action cells. This defines how the communication flows through the script.
- Configure action cell properties. This defines your script functionality
- Commit the script to storm. This makes it available to other storm applications (for example, to the INBOUND application in storm STUDIO, where it can be assigned to an access point).
Refer to Introduction to the FLOW Application for assistance in the following sections.
-
On launching FLOW, click the New button in the dialog that is displayed:

- In the New Script dialog, leaving the script type selection to 'INBOUND', click the Create New Script button.

Adding Action Cells
-
Expand the relevant action cell panel by clicking its
 button.
 -
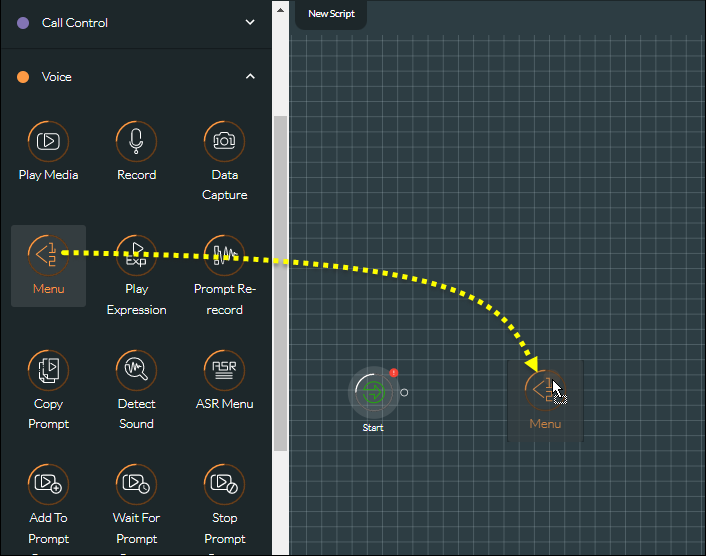
From the panel, drag and drop the desired action cell type to the right-hand side of the Start action cell on the workspace:
-
Add more action cells as required.
Note: to delete an action cell, select it and then click  in the Action Cell Properties panel.
Note: to move several action cells to a different workspace location using a single drag, click the  Multi-Select button below the workspace and then draw a rectangular marquee to include the action cells you want to move. As an alternative to using the button, press the keyboard SHIFT key as you draw the marquee.
Establish Flow Routes Between Action Cells
You establish interaction flow routes in your script by connecting action cells.
Connect Action Cells
-
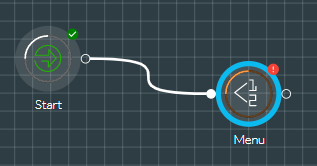
Click the Start action cell's connector
 (located to its right). This displays a large arrow:

Click anywhere on the first action cell that should run in the script. The two action cells are connected:
-
Connect any two action cells by first clicking the
connector on the source cell and then clicking anywhere on the target cell. On selecting the target cell, you may be presented with a dialog prompting you to control the behaviour of the route by configuring link options on the source action cell's exit point. Select the appropriate option and then click Continue. (Exit points are documented in the FLOW Action Cell Reference.) Shown below is the dialog that appears when joining a Menu action cell to another action cell. The user has decided to configure this particular exit point with DTMF keypress number 1.

-
Complete all connections:

Move a Connection to a Different Action Cell
- Right-click the connection and then select Move from the context menu.
- Click the new target action cell.
Edit the Behaviour of an Action Cell's Exit Route
- Right-click the connection and then select Edit from the context menu.
- Edit the desired options in the Link Options dialog that is displayed and then click Continue.
Configuring Action Cell Properties
-
Select an action cell and then configure its properties in the action cell properties panel.
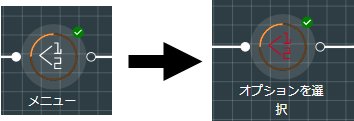
All action cells share three general properties: Action Cell ID, Action Cell Name, and Action Cell Colour. The action cell name is that which appears on the workspace and the colour is that of the image within the action cell's border. Change these if desired. Shown below is the effect of changing a Menu action cell's name to 'Select an option' and its colour to red. This does not affect the action cell's ID or its behaviour.
The FLOW Action Cell Reference describes the properties and exit points of all FLOW action cells.

An action cell text entry field that is marked with an asterisk (*) indicates that the property is mandatory and that you must provide a value:
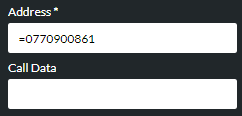
Action cell fields accept literal values, variables, or both. A literal value must be preceded by an '=' character.
Note: a date value must be provided as a variable and not as a literal.
- Click Save in the Action Cell Properties panel to save action cell properties.
- Check the status of the Incomplete Cells panel.
It will be marked with a ![]() or a
or a ![]() symbol:
symbol:

![]() means that at least one action cell in the workspace is not fully configured and that you must resolve this before being allowed to commit the script. To do this, expand the panel by clicking its button to see the details.
means that at least one action cell in the workspace is not fully configured and that you must resolve this before being allowed to commit the script. To do this, expand the panel by clicking its button to see the details.
Use the information in the table below to resolve any incomplete action cells:
|
Incomplete Cells Item |
Description |
|
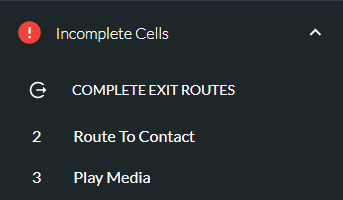
COMPLETE EXIT ROUTES |
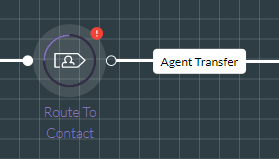
If this is greyed out, there is no action to take. If it is not greyed out (as shown above), then one or more action cells in the workspace has exit routes that are not connected to other action cells. In the following example, the Route to Contact action cell's 'Agent Transfer' exit point is connected to another cell but its other available exit routes are not:
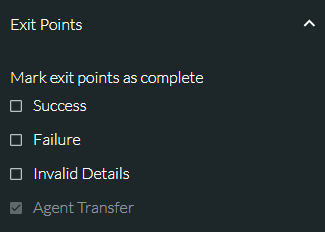
In the action cell's properties panel, the other routes are shown as enabled (not greyed out) and their check boxes are clear:
You must either select the check boxes to mark them as complete, or return to the workspace and connect those exit routes to other cells. Selecting a check box instructs FLOW to ignore the exit route when its condition (such as 'Success') is met, indicating that no special handling is required for that particular event. For an incoming call, the call will end and a clear down handler script will be triggered (if configured). Remember to save any changes that you make to action cell properties. An easier way to mark all exit points in your script's action cells as complete is to click the COMPLETE EXIT ROUTES button in the Incomplete Cells panel. This automatically saves the changes in every action cell.
|
|
<action cell ID and name> |
The action cell has at least one unconfigured property. Click the action cell item. This centres the action cell in the workspace and opens its properties panel. You must identify and configure the properties and save the changes. |

Saving and Committing the Script
-
Select the SAVE SCRIPT command from the menu at the top right of the screen:

-
Provide a unique and meaningful name for the script.

-
Click Continue.
-
Enter a comment to indicate, for example, the purpose of the script or to identify the changes you have made to it.
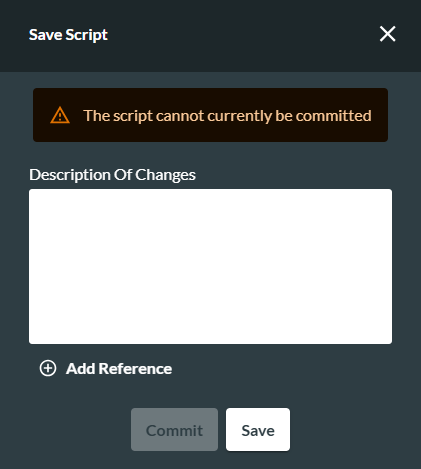
-
Optionally, click the
 Add Reference button to display further fields that allow you to enter, for example, the reference of a document or change request related to the script or the amendments you have made to it.

-
You can enter additional references, if required, by clicking the
Add Reference button again to display further fields. If the script is ready for live deployment, select Commit. This, as well as saving the script, will also make it visible to other storm applications such as storm INBOUND from where it can be assigned to access points. If the script is not yet ready for deployment but you wish to save your progress, click Save instead.
Committing a script for the first time generates 'Version 1' of the script. This version will run when the script is invoked (for example by an incoming to an access point to which this script has been assigned).
See also, FLOW Script Versions.