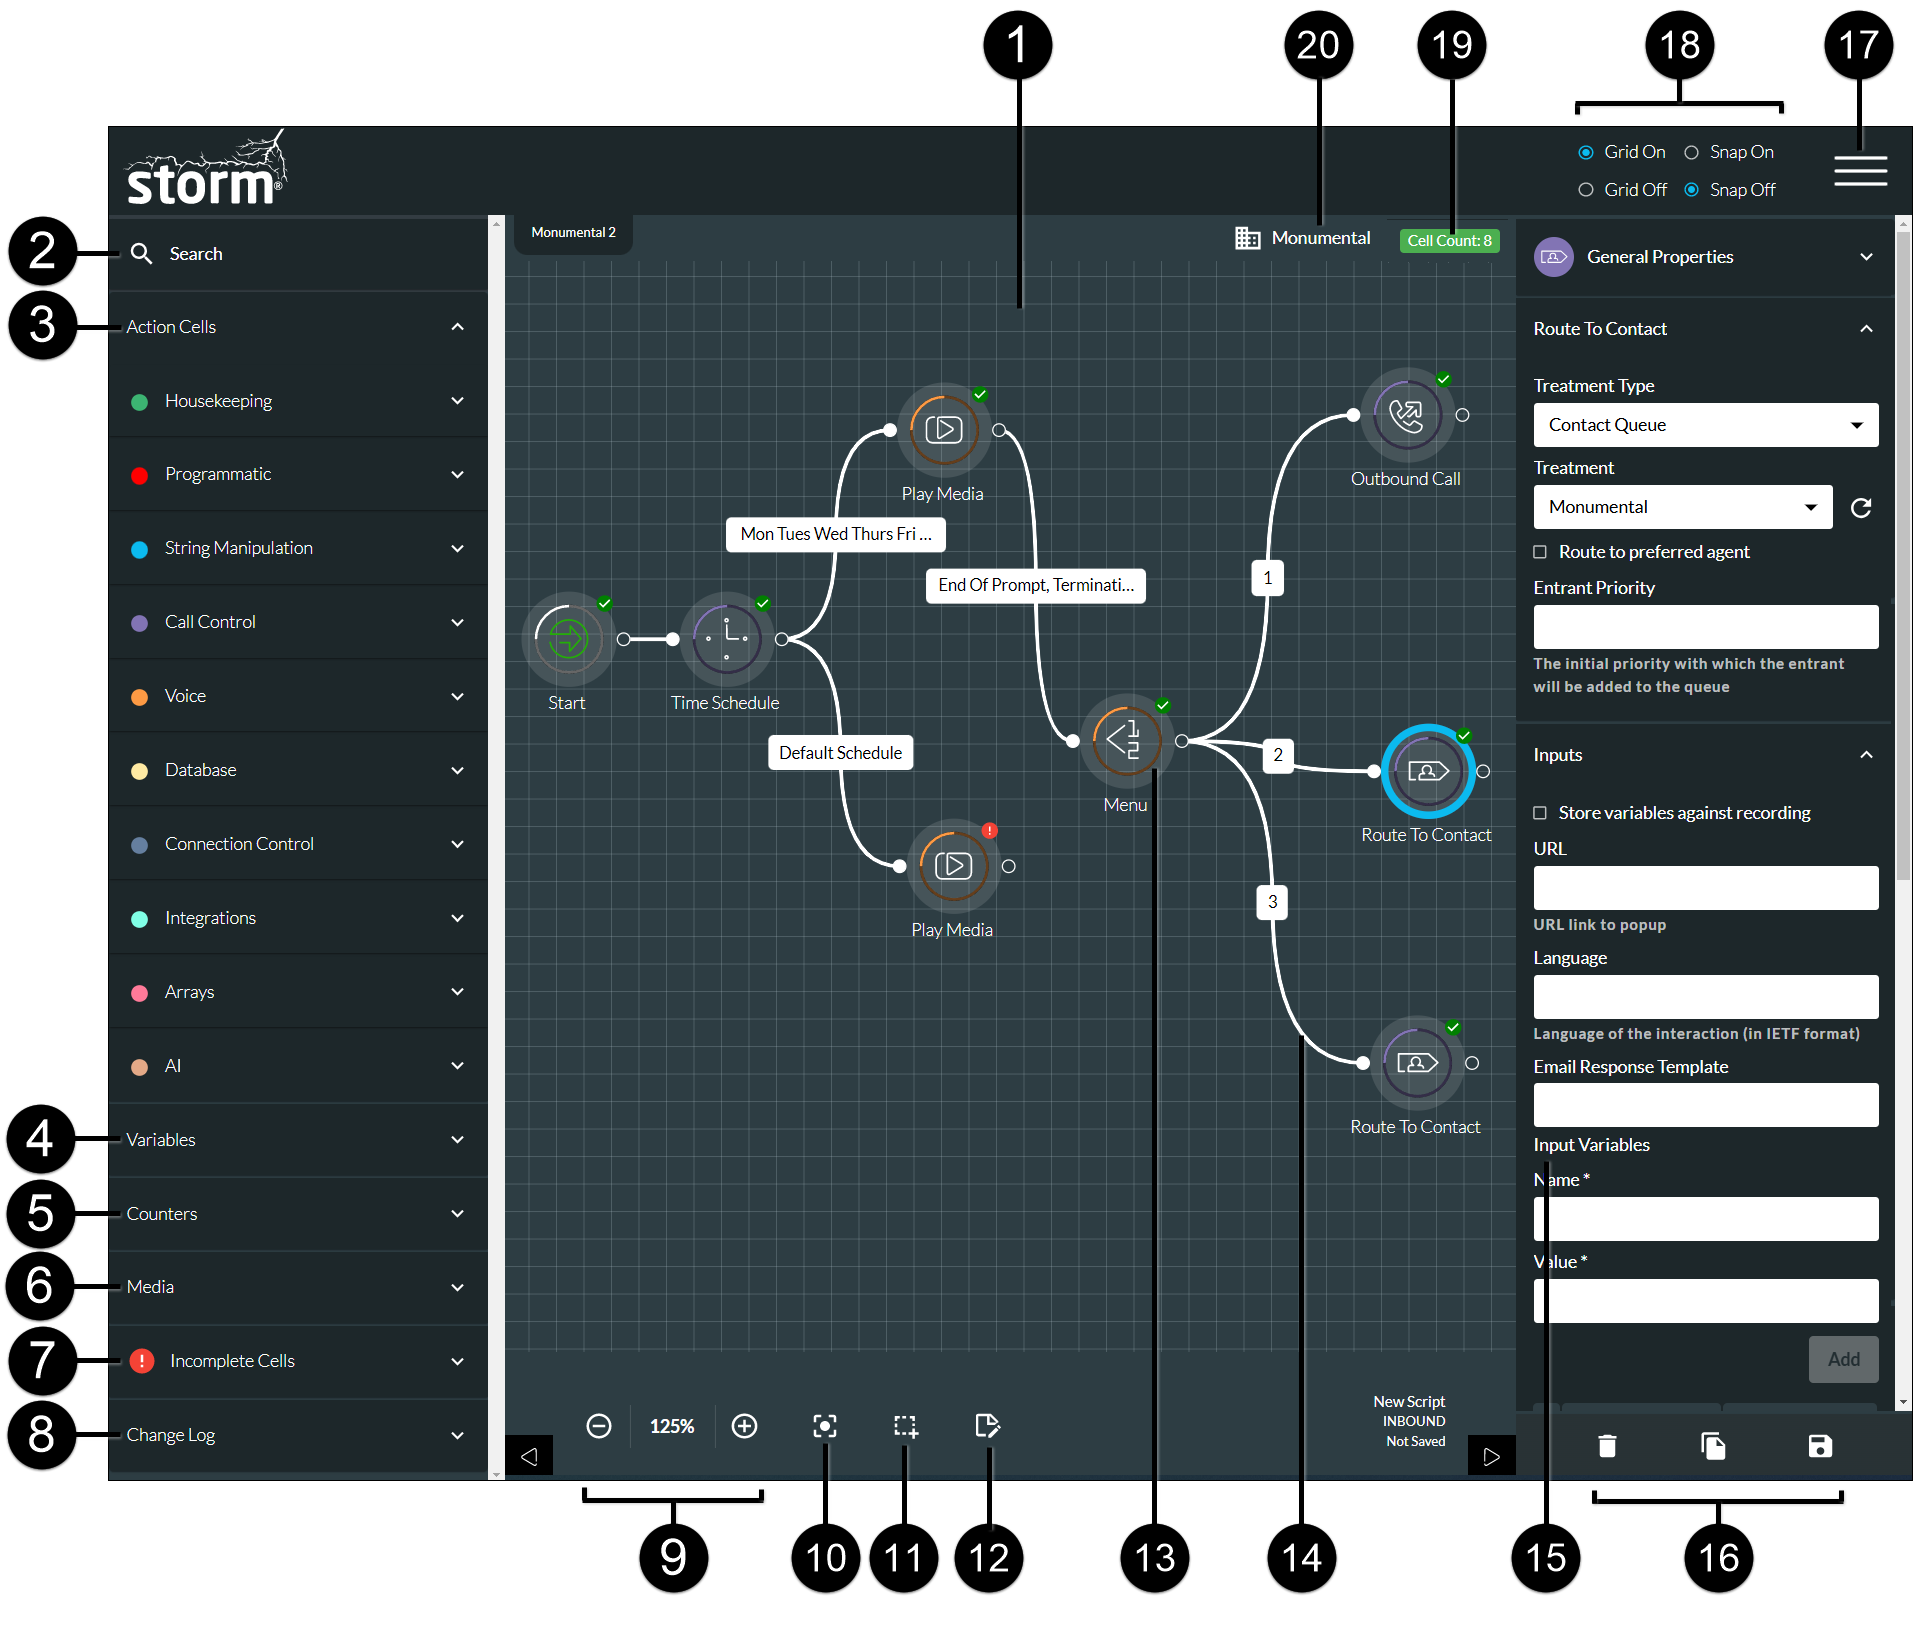
Introduction to the FLOW Application
|
Label |
Element |
Description |
|
1 |
Workspace |
Drag and drop action cells into this workspace to create your script. |
|
2 |
Search button |
Click this to search for and navigate to a particular action cell in your script. In the displayed dialog, which lists all action cells, use the Search field to filter the list. You can filter by entering either the ID, or the name, or the type of action cell you are looking for. Click the Show Me button next to an action cell to highlight the action cell on the left-hand side of the workspace. The action cell's properties are also displayed. |
|
3 |
Action cells panel |
Expand the panel and then expand a category to see its action cells. |
|
4 |
Variables panel |
Expand the panel to see variable configuration controls and a list of variables (categorised by type) that are included in the open FLOW script. |
|
5 |
Counters panel |
Expand the panel to see event counter configuration controls and a list of event counters that are included in the open FLOW script. |
|
6 |
Media panel |
Expand the panel to see the media player. This allows you to play audio files that are present in your media lists. See also, Use Media in a Script. |
|
7 |
Lists all action cells whose mandatory properties have NOT been configured or whose exit points have not been resolved (that is, exit point that have not been connected to other action cells or marked as complete in the action cell properties). Clicking an action cell in the list displays it on the left-hand side of the workspace and also displays its properties. |
|
|
8 |
Lists every change that you make to action cells, variables, and event counters in the active (open) script relative to the previous loaded version of the script. |
|
|
9 |
Zoom controls |
Click the |
|
10 |
Click this to navigate to the Start point in your script. This is useful when zooming and panning have caused the Start point to go out of view. The current zoom level is retained. |
|
|
11 |
Click this if you want to move several action cells to a different workspace location using a single drag. The button turns blue allowing you to draw a rectangular marquee to include the action cells you want to move. |
|
|
12 |
Click and drag this onto the workspace to add a sticky note. |
|
|
13 |
Action cell |
Include a particular function in your script. |
|
14 |
Exit route |
Define how execution should flow to the next action cell. |
|
15 |
Action cell Properties panel |
Configure the behaviour of the selected action cell. |
|
16 |
|
|
|
17 |
Menu |
Allows you to create a new script, load an existing script, save the current script, and access the on-line Help. |
|
18 |
Grid controls |
Allows you to turn the grid on and off and to turn snap-to-grid on and off. |
|
19 |
Shows the number of action cells in the current FLOW script. The number of action cells in a script can impact FLOW's performance, and for this reason it is recommended that you limit the number of action cells in a script to a maximum of 300. The colour of the indicator changes from green to amber at 200 action cells, and then to red when you reach 300. You are however able to build and save FLOW scripts with 300 or more action cells. Note: you are able to split large FLOW scripts, into parent scripts and subsidiary scripts, as described in the section Implement a Subsidiary Script. |
|
|
20 |
The name of your organisation. |
 and
and  buttons to zoom out and in on the workspace. The % zoom is displayed between the two buttons. Clicking this resets the zoom to 100%.
 Deletes the selected action cell and its property configuration from the workspace.
 Duplicates the selected action cell and its property configuration in the workspace.
 Saves the action cell property configuration.
The ![]() button toggles the display of all panels on the left of the workspace. The
button toggles the display of all panels on the left of the workspace. The ![]() button toggles the display of the Action Cell Properties panel.
button toggles the display of the Action Cell Properties panel.
See the FLOW Action Cell Reference.
FLOW Script Versions
A FLOW script can be saved and committed. Committing makes the script active and therefore available to other applications. This allows the script to be assigned to storm access points for live access and to be used in storm VIEW reports, for example.
Committing a script for the first time assigns it a version number of 1 and this value increments every time the script is committed by an administrator. Previous versions of scripts are not lost. With two or more versions of a script on your system, you can quickly switch between making any one of them active. See Activate a Different Script Version.
If you want to create a new version of a script, you can do so from any previous version without losing any versions. For example, if there are three versions of a script and you wish to create a new version that is based on version 2, you can load version 2 and then re-commit it. This creates version 4 of the script (version 3 is not lost). Metadata for a script version that has been saved or committed before, indicates the saved edition or version it was created from, or if it was imported from a previous export.
Effect of storm Access Profiles
An access profile set up by you or another storm administrator may be used to restrict access to selected scripts, delivery points (including delivery point groups), media lists, and pacing profiles in FLOW. (Pacing profiles are used in scripts of type OUTBOUND.)
Restricted scripts, delivery points, and pacing profiles are completely hidden from view. Restricted entities in action cell properties (such as media lists and scripts) are visible but not accessible.
Note: see the storm STUDIO User Guide for information about access profiles and what they can restrict.